Tuesday 7 February 2017

Getting past Antivirus detection with Shellter

Introduction


In this post I will be showing you guys how to make your payloads undetectable from antivirus with the help of shellter, shellter works by injecting shellcode(your payload) into native Windows applications, right now it only works with 32-bit applications. You can read more about the details of shellter here.

Installing Shellter


Go to the download page on the shellter project website to download and install shellter, they have instructions on installing shellter for windows and linux. However, it is recommended that you use windows or kali linux as the other linux distros repositories might be outdated. Your anti-virus will probably flag the file as malicious in windows, just allow it through your anti-virus.

Using Shellter


First we need to get the executable we want to infect, this can be any 32-bit exe. I am going to be using putty.exe for this example. I already downloaded it to /root/Downloads.

Open terminal and type in shellter to launch shellter.


Enter A for for auto mode and enter the path of the executable you want to infect.


It will start tracing instructions and it will take about a minute so just wait while it does it's thing.


You will then be asked if you want to enable stealth mode, stealth mode basically allows the executable to be able to function normally. It's up to you if you want to enable it.


You will then be prompted to choose a payload or use a custom one, enter L for a listed payload and C for a custom payload. I will be using reverse tcp for my payload.


Then it's just your reverse tcp settings, LHOST is the ip address of the machine you are going to be listening on and LPORT is the port you are going to listen on.


Since we are using auto mode, that's all that we need to do, everything else is automated.


Now the putty.exe at my /root/Downloads folder have been successfully injected with a reverse tcp payload. There is also a backup of the original file at /root/Shellter_Backups. You see if your infected executable is detectable by any anti-virus by scanning it at nodistribute.com as other online scanners will send the files to the anti-virus companies, which is not a good idea. This is the results i got after scanning the infected putty.exe. Only 2 out of 35 of the anti-virus flagged it as malicious, that is pretty amazing.


Now you just need get the infected putty.exe onto your target machine and run it, there are many ways to do this such as using a USB Rubber Ducky and I have a tutorial on making your own DIY USB Rubber Ducky if you are interested. 

Here I start listening for connections on kali before i run the putty.exe.


After I run putty.exe I now have a reverse tcp connection to my target.


Now getting past anti-virus detections shouldn't be a problem for you anymore :) here are some tips and tricks provided by the shellter project.


Tuesday 31 January 2017

DIY USB Rubber Ducky (using arduino/teensy)

Introduction


This tutorial will teach you how to make your own diy usb rubber ducky using arduinos. If you don't already know, the usb rubber ducky is a keyboard emulation device and is treated as a keyboard by the computer, this allows you to inject keystrokes as if you are actually typing but at superhuman speeds.

Requirements

  • A compatible board
  • Micro usb male to usb male adapter
  • A usb case for your board to make it more discrete (Optional)

Compatible Boards (as far as I know)

  • Arduino Pro Mricro
  • Arduino Leonardo
  • Digispark
  • Teensy 3.2

Steps


First download and install the arduino IDE from here.

If you are using a teensy you also need to download the Teensyduino add-on for the arduino IDE you can follow this guide on how to download and install the Teensyduino add-on.

Next download Duckuino, which is a Duckyscript to Arduino Converter the github link is here. It says the project is no longer maintained, however it still works fine.


Extract the folder from the zip and open the the index.html file.


It should open this webpage and you can type in ducky script on the left and it will be converter to arduino on the right after you click on compile.


Now just copy and paste the arduino script into your arduino IDE like so.


Before you upload your script to your arduino/teensy you need to make a few changes to ensure your script runs properly.

First you need to change the settings on your arduino IDE, go to tools and select which ever board you are using for example if you are using teensy3.2 then you need to select "Teensy 3.2/3.1", then change the usb type to "Keyboard" which is also under tools.

Then you need to make some adjustments to the script you pasted into the IDE as there are some issues with the ducky script converter, the first is it converts everything to caps, that can be a problem as "Windows key R" dosent work but "Windows key r" does, so if you want to open run command u need to use this.


All you need to do now is to plug in your arduino/teensy into your computer using your adapter and click on upload. The script will run immediately after being uploaded so just be prepared for that.

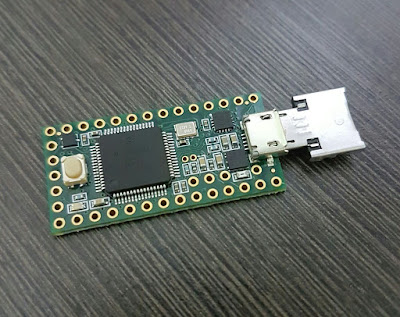
Here is my teensy 3.2 :)
I would recommend the adapter i'm using as it is very small and discrete.
Now every time u plug it into a computer it'll run the script immediately. You can visit this site for some inspiration on what you can do with this. Good luck and have fun!

Sunday 22 January 2017

OpenVPN Server on Raspberry Pi

Introduction


In this tutorial I'll be showing you guys how to easily set up an OpenVPN Server on a Raspberry Pi using PiVPN which makes the set up of OpenVPN Server a lot easier and saves you a lot of time. Having an vpn server in your home allows you to connect to your home network from anywhere in the world, this can be very useful especially if you have a NAS(Network-attached storage) at home.


Requirements


  • A raspberry pi running raspbian(you don't have to use raspbian but it is the easiest way and that's what I am going to be showing here)
  • Ethernet connection for your Raspberry Pi.(you can use wifi but it is not recommended)
  • 30 to 60 minutes of your time.


Set-up


SSH into your raspberry pi


Windows

If you are using windows use putty to ssh into your raspberry pi, the default username is "pi" and password is "raspberry".


OS X/Linux

If you are using OS X or Linux open the terminal and type this, replace the ip address with the ip address of your raspberry pi for this example I'm using the ip of 192.168.1.80.


Running PiVPN


After successfully connecting to your Raspberry Pi run this command.


Press Enter until you reach this screen.


Select eth0 as your interface, press space to select and press tab and enter.


Continue pressing enter until you reach this screen.


Make sure to select yes to keep your server OpenVPN Server updated.


Leave the port as 1194 unless you want to use another port.


Select the 2048-bit encryption.
Continue with the default options and reboot the pi after completing the installation.


Adding Clients


Run the command below to add a new client to the server.


The new client file will be in /home/pi/opvns, you can use a program like WinSCP or filezilla to get the file from the pi, and that's all you need to do on the pi now you just need to set up your client to connect to the server.


Static IP


Since your Raspberry Pi is a server, it needs a static IP, this can be done by Reserving an IP for the mac address of the Raspberry Pi, this can be done by accessing your router's admin page.


Port-Forwarding


Before you can connect to your server from outside of your home network, you need to port-forward the specified port(the default port is 1194) for the OpenVPN server to your Raspberry Pi. For example if the ip of your Raspberry Pi is 192.168.1.80 then you need to forward port 1194 to 192.168.1.80 you can do this via your router's admin page.


Connecting to the OpenVPN Server


Windows

Download the OpenVPN client from here and import the .ovpn file that you retrieved from the pi. Then just connect to the server using the credentials you set up for that client.

OS X

Download Tunnelblick from here, double-click the .dmg file to install. Usage is similar to windows OpenVPN client.

Linux

Ubuntu/Debian based systems


CentOS


To connect to the server


Android

Install OpenVPN Connect from the play store, then import the .opvn file and connect to the server.

IOS

Install OpenVPN Connect from the app store and connect your phone to your computer, open itunes and click on iPhone > Apps. Scroll down to the file sharing section and click on OpenVPN Connect, then drag and drop the .ovpn file into the OpenVPN Connect Documents tab.

Alternatively you can upload the .ovpn file to a cloud service like dropbox and download the file from your browser and open with OpenVPN Connect.